
A pouch dieline is the converter’s flat layout for positioning artwork on a particular pouch. Start by checking the bag format, dimensions and drawing revision. Then identify the trim, bleed, safe areas, seals, folds and opening features. Use the drawing’s own legend: a region that allows background color may still be unsuitable for text, while a marked no-ink area must stay clear.
Read with your artwork beside the drawing. The aim is to answer two questions for each element: where does it belong on the flat layout, and what happens to it when the pouch is formed and opened?
Start with the right pouch template and revision
Before placing anything, match the drawing to the pouch you are ordering. Find the supplier, template identifier, revision, bag format, dimensions and units. Confirm which surfaces receive print. A familiar filename or a matching capacity description is insufficient: two bags sold for the same product weight can have different proportions, folds and opening features.
Read the dimension labels before comparing numbers. Finished width and height do not automatically describe the entire flat artwork area. If a bottom gusset is included, establish how the supplier expresses that dimension. Ask whether a quoted measurement describes the complete gusset or a particular folded portion; use the definition attached to your project.
Keep the template at its supplied size. Roastar’s template guide specifically tells customers not to resize its templates and explains that bleed is already included. That is a useful reason to inspect the supplied instructions before adding extra space or dragging the drawing to fit an old design.
If the quotation and drawing appear to disagree, identify the two labels causing concern. For example, ask the supplier to reconcile the quoted finished height with the height annotation on the named template revision. Do not average the values or choose the one that makes the existing artwork fit. Resolve the identity of the drawing first.
Compare the specified features with the intended configuration. A drawing without the required opening feature is not ready for artwork approval simply because its overall dimensions match. If the pouch size, construction or feature location changes, request confirmation of the corresponding template. Resizing the graphic layout does not establish that the manufacturing geometry remains suitable.
Use a product photo to recognize the intended object, then return to the drawing for its boundaries. In Figure 1, the chocolate sachet’s pink edges, dark central artwork and side notches are visible. None of those color transitions identifies a measured seal boundary. Likewise, apparent clearance in a photograph cannot confirm that your proposed text placement meets the current template’s requirements.

Read bleed, trim, safe areas and seals as different instructions
First read the legend without the artwork obscuring it. Identify what each line or shaded region controls, including any written exception. A color used for cutting on one supplier’s drawing may mean something else on another. Do not carry a remembered color key into a new template.
The table below translates common instructions into placement decisions. It is a reading checklist, not a replacement legend for the file in front of you.
| Instruction on the drawing | What to check | Artwork decision |
|---|---|---|
| Bleed boundary | Whether bleed is already included and where permitted background artwork must end | Extend the background to the specified boundary without enlarging the template |
| Trim or cut line | The intended finished edge and any stated cutting tolerance | Keep essential content within its safe area, not just inside the cut line |
| Safe area | The panel and content types covered by the marked region | Position important text and graphics inside it, then check additional restrictions |
| Seal area | The seal location and its specific printing instruction | Follow that instruction; do not presume backgrounds are allowed or all ink is prohibited |
| Local no-ink restriction | The affected panel, boundary and scope of the restriction | Keep the specified area free of ink and resolve any conflicting instruction |
| Fold or gusset reference | Which part folds inward, expands or meets another panel | Check the formed position before placing content across the boundary |
| Opening and closure features | The tear-off area, notch, self-sealing strip and other specified features | Check whether essential content remains legible in the intended use state |
| Production marks and reserved areas | Which areas are reserved for converting or packing | Preserve the required space and ask about missing or unclear instructions |
Extend backgrounds outward; keep critical content inward
Trace the trim line first, then find the separate bleed boundary outside it. Where the template requires bleed, a background ending exactly at trim leaves no printed extension to accommodate the specified cutting variation. Extend the permitted background to the indicated boundary. Do not move the trim line to make the artwork appear compliant.
Now locate the safe area for critical content. A word can sit inside trim yet still cross this inner boundary. Moving that word inward solves a different problem from extending the background outward. Neither action establishes the correct clearance for an unrelated feature elsewhere on the pouch.
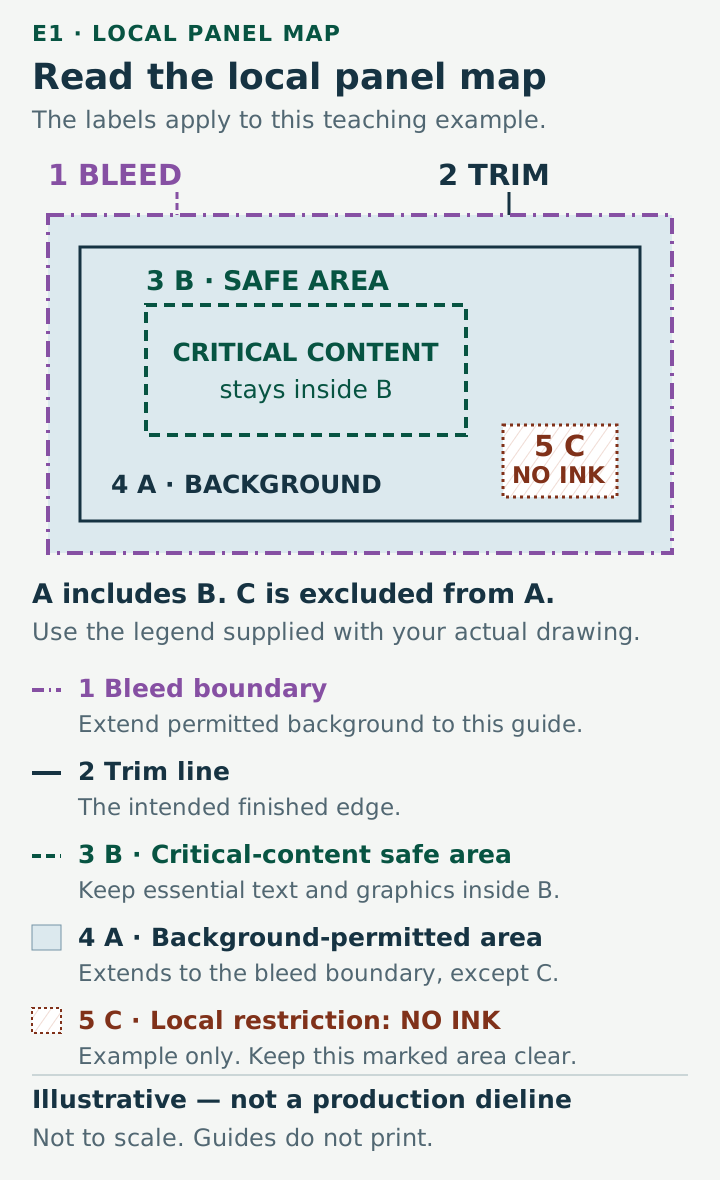
Figure 2 uses a hypothetical local panel, E1, to practice this distinction. It has no dimensions and is not drawn to scale. Its letters are teaching labels, not industry codes. Read A as the background-permitted area extending to the indicated bleed boundary, except for C. B marks the critical-content safe area. C is a local no-ink area specified by this example’s legend.
Separate background permission from a no-ink instruction
A seal label identifies a structural region; its printing restriction still needs to be read. Roastar’s FAQs describe no-ink requirements that depend on the product and material. You therefore need the local instruction for the selected pouch, rather than a blanket rule that every sealed region accepts a background or excludes all print.
The TC Transcontinental example dieline likewise distinguishes areas where backgrounds are permitted but text is restricted from areas with a no-ink instruction. Its particular geometry and measurements belong to that example.
On E1, background permission in A does not cancel C’s restriction. Nor does B authorize printing in any conflicting restricted area on a real drawing. If instructions overlap ambiguously, mark the overlap and ask the converter to resolve it. Guessing which colored line takes precedence creates an unapproved layout decision.
Map the flat artwork to the finished pouch
Once the boundaries are understood, locate each panel on the finished bag. Start from a labeled front panel and identify the corresponding back, bottom gusset or side panels. Use the supplier’s labels and orientation indicators. Do not infer a flip, rotation or mirror operation solely because one part of a flat layout appears upside down beside another.
Give the supplier a specific viewing description when direction is unclear: “With the pouch upright and its front facing the viewer, which edge of this bottom message faces forward?” That question can be answered on a marked drawing. “Is the bottom correct?” leaves room for two people to imagine different views.
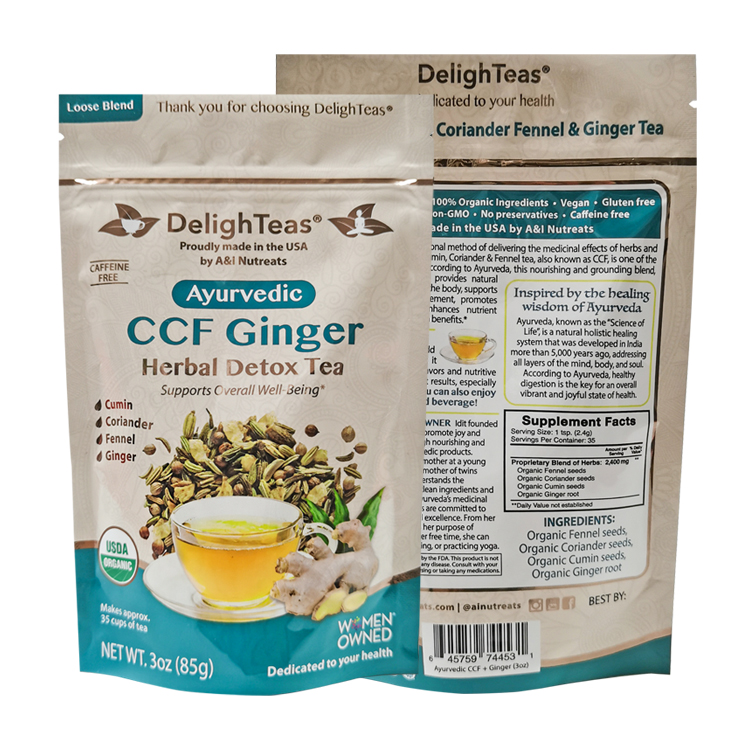
Figure 3 exposes the printed base of a tea pouch, also shown from the top in Figure 5. The bottom carries artwork, but its position in this view does not mean that a shopper sees the entire message while the bag stands normally. Locate that printed area on the template and consider which portions fold inward or become visible as the pouch takes shape.

For an existing stand-up format, use the stand-up pouch structure guide to identify the bottom-gusset construction before reading your drawing’s fold areas. Then match the actual configuration: a different gusset arrangement or opening feature needs its own confirmed layout.
Figure 4 shows a different relationship between the front, side corners and rectangular bottom on a coconut-sugar pouch. It gives you surfaces to identify; it does not reveal how the supplier arranges those surfaces for printing or converting. A single continuous drawing, separate panel files and other supplied arrangements should be interpreted according to their own instructions.

If your project changes to separate side and bottom panels, review the flat-bottom panel and opening guide before transferring the design. Request the matching panel map rather than treating the old artwork’s arrangement as fixed. Check each panel’s reading direction again after the transfer.
A simple paper model can help you discuss which printed face turns inward. Use it to locate the question, then have the supplier confirm the intended structure. Folding paper does not verify film behavior, achievable alignment or production clearances.
Trace both ends of any message spanning adjoining areas. Confirm where its first and last words land when the relevant fold closes. If one end disappears underneath while the other remains on a visible face, mark that split on a review copy. The supplier can then confirm the reading position you intend without changing the production drawing to fit an assumption.
Place essential information around openings and moving surfaces
Place the information that must remain readable before arranging decorative details around it. Identify the product name, necessary product wording, barcode and date or batch-code position. Give each a proposed panel and check that position against the safe area, local restrictions and intended opening state.
Read the top region as several possible instructions. The final seal, a self-sealing strip and the portion removed during opening serve different functions and may occupy different locations. Find each feature on the current drawing if it applies to your pouch. A printed band across the top does not establish where a closure sits beneath it.
The tea close-up in Figure 5 shows a side notch, upper wording, a black horizontal band and branding below. Use the notch to raise the opening-path question. The photograph alone cannot establish that the black band is a self-sealing strip or tell you exactly which printed portion will be removed.

For a message needed after first opening, compare its position with the confirmed tear-off portion. If it would leave with that portion, move it to an appropriate remaining panel. For a message intended to be read before opening, still check that the final sealed presentation leaves it visible. Mark which reading stage you mean instead of approving all top-panel text together.
Treat the barcode as a separate placement check. Being inside the general safe area does not verify its required clear space or reading performance. Keep adjacent graphics from intruding into its specified quiet zones, and confirm the selected location against the barcode requirements and formed pouch. GS1’s General Specifications state that barcodes and their quiet zones must avoid seams and folds. Mark those relationships on the drawing before fixing the surrounding design, and arrange the appropriate barcode verification for the proposed pack.
Reserve a deliberate location for variable date and batch information. Confirm where the packing operation will apply it and whether nearby graphics, a fold or a restricted area would interfere. A blank rectangle in the artwork is only a proposal until the relevant operation accepts its position.
Finally, inspect relationships rather than isolated objects. A product name may be safely placed while its adjacent flavor descriptor crosses a boundary. A complete instruction may become incomplete if one line folds out of view. Check the whole message in the intended display and opening states, using a suitable sample when the flat file cannot settle visibility.
Correct the artwork on the same drawing
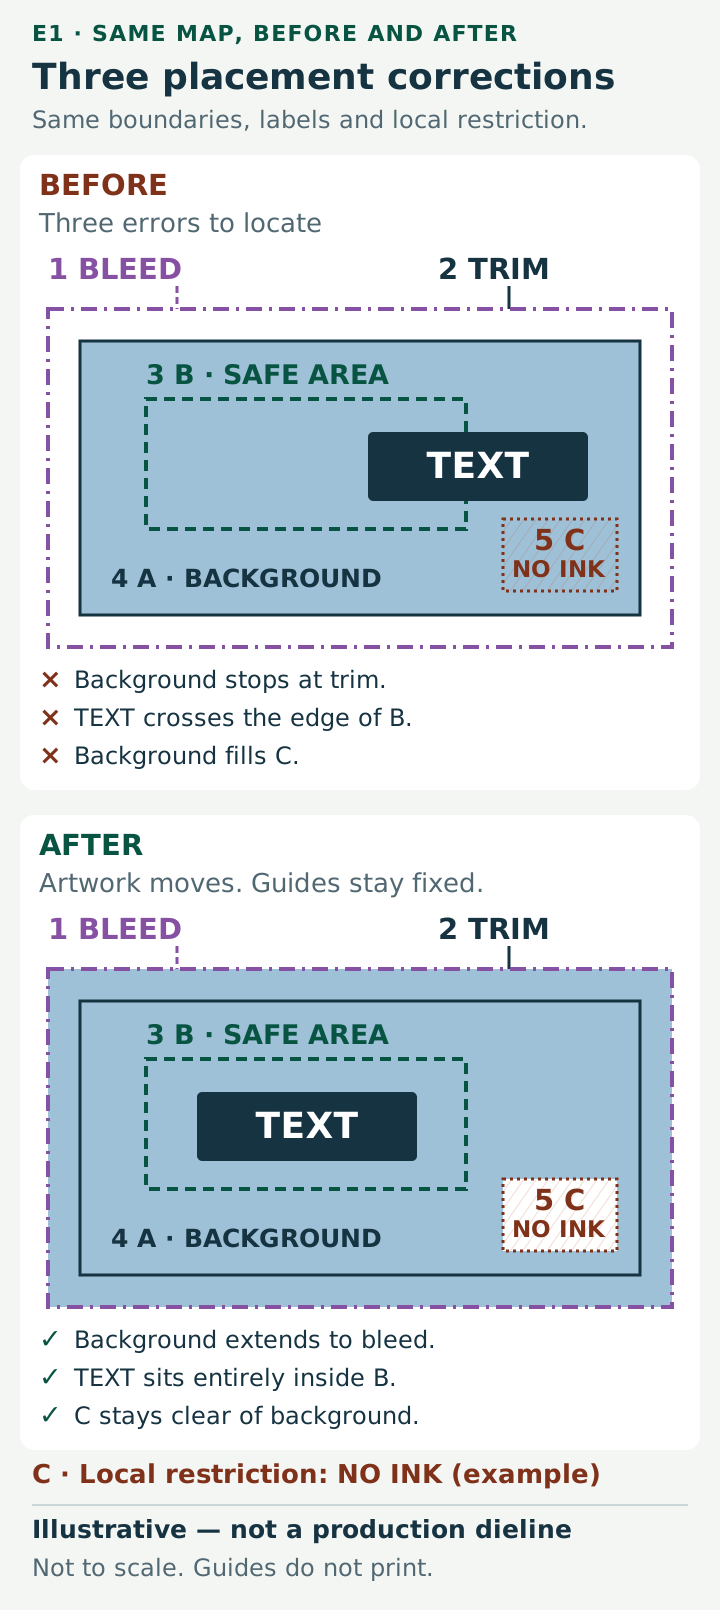
Return to E1 and keep its boundaries fixed. Figure 6 adds a background and a generic TEXT block to the same local panel. The incorrect version contains three deliberate errors: the background stops at trim, the text extends outside B, and background color fills C. These are teaching examples, not a record of a customer’s order.
First, extend the background through the permitted part of A to the indicated bleed boundary. This addresses the missing extension at the edge. It does not authorize printing inside C or demonstrate compliance with a different production template.
Second, move the entire text block inside B. Check the complete block, including the ends of lines; do not judge its position only from its center. This corrects the illustrated safe-area violation. It does not establish that the wording is complete or that the text will be readable at the chosen printed size.
Third, remove the background from C. Leave that marked no-ink area clear in the corrected version. On a real job, clarify which artwork layers a local restriction covers before approving any special print treatment there.
Clearing C means removing the artwork that would print there. Covering an unwanted background with a white-filled object does not by itself prove that an area is ink-free, particularly when white ink is part of the agreed print setup. Inspect the relevant layers rather than relying on the preview’s apparent blank color.
The remaining situations below extend the checking method beyond E1. Folds, seams and opening paths are not depicted in that local illustration.
| What you notice | What to verify | Revision to discuss |
|---|---|---|
| Background stops at the cut line | The actual bleed boundary and local ink permission | Extend the background as instructed without moving the dieline |
| Text or a logo crosses the safe boundary | The applicable safe area and nearby restrictions | Move or resize the complete element within the approved region |
| Background fills a no-ink area | The local restriction and affected artwork layers | Clear the area and refer ambiguous requirements to the converter |
| A fine border needs perfectly even edge spacing | Cutting and forming tolerances for this construction | Move, simplify or remove the border and review the result |
| An image must meet precisely across a fold or seam | Panel direction and achievable alignment | Separate critical details or choose a less alignment-sensitive background |
| Information sits on the tear-off portion | The opening path and when the message must be read | Move information that must remain after opening |
| A bottom message has uncertain direction | Panel labels and the intended underside view | Mark the required reading direction for supplier confirmation |
Close the open questions on the marked drawing
A useful approval exchange identifies the exact region and the decision needed. Keep the drawing visible while commenting, and connect each question to a panel or zone. A cropped screenshot can show the issue, but include its template revision so the supplier can locate the same geometry.
For example, before this teaching exercise’s C restriction had been clarified, the question could read:
On the front panel, our background enters area C. Please confirm whether C is an ink-free area or a background-only area, and mark the applicable restriction on the next drawing revision before we approve this layout.
This is a hypothetical inquiry. In Figures 2 and 6, the example legend already defines C as no ink. The wording demonstrates how to return an unresolved distinction to the supplier instead of silently choosing a meaning.
| Check | How to verify | What to record |
|---|---|---|
| Template identity | Match the drawing to the quoted format and dimensions | Supplier, template ID, revision, units and configuration |
| Panel orientation | Follow front, back and gusset panels into the finished form | Agreed panel map and the drawing revision resolving any direction question |
| Bleed and safe areas | Inspect the artwork with technical guides visible | Artwork revision showing background extensions and protected content |
| Seal and feature restrictions | Read each local instruction and inspect its boundary | Panel or zone ID, the question and the revised drawing that resolves it |
| Opened and filled appearance | Use a relevant physical reference for unresolved visibility questions | Sample identity, condition viewed and any remaining issue |
| Final production handoff | Confirm the required handling of artwork and technical layers | Exact submitted file, proof version and scope of approval |
Record what remains unresolved as clearly as what has changed. A completed teaching record might say: “Teaching drawing EX-01 rev B / artwork rev 3: text moved inside B; background removed from confirmed no-ink area C. Opening-path question unresolved; layout approval pending.” These identifiers are invented for the example.
When a revised drawing arrives, check the answered region against your artwork again. A clarification can change the usable area. Refer to the returned drawing’s identifier in the approval record so a correction made against an earlier version does not become the assumed final decision.
Use each reference for the question it can answer. The flat overlay shows whether an element crosses a marked boundary. A model helps discuss panel direction. An appropriate formed sample helps assess where a message sits in the condition being reviewed. Do not let one reassuring view stand in for the other unresolved checks.
Finally, agree how the production submission handles technical guides. ePac’s artwork support guidance requires artwork on its supplied dieline with organized layers. Roastar’s guide separates artwork from technical information and calls for removing its template for the clean artwork submission. Follow the receiving supplier’s requirements; keep your review reference identifiable, and verify that guide lines, zone labels and dimensions will not print unintentionally.
Free pouch design with print-ready, layered files
Mylarbag offers free pouch design and provides customers with print-ready, layered artwork files. If you have a logo, product wording and a design direction, we can help turn those materials into a pouch layout for the agreed bag format and dimensions.
That layout needs to account for the bleed, safe areas, folds, sealing restrictions and opening features discussed above. The drawing helps determine where a background can extend, where essential information should remain and which questions need clarification before the artwork is approved.
Layers make individual changes easier to review. Keeping artwork separate from technical guides allows a text block to move or a flavor name to change while the drawing remains available as a reference. You can compare the revised element with the same panel boundaries instead of judging it from a flattened product mockup. Special print instructions, including a white-ink layer where required, should follow the agreed material and printing setup.
Print-ready files relate to that confirmed specification. A change in pouch size, construction or printing process may require another layout check. Your final product wording and the approved artwork version still need confirmation before printing.
Share your existing brand assets, the wording you want on the pouch, the intended bag format and any dimensions or supplier drawing you already have. Identify the particular placement problem, such as fitting a back-panel text block, preserving a message after opening or adapting artwork to a different panel arrangement.
Frequently asked questions
What is a pouch dieline?
A pouch dieline is a flat layout used to position artwork for a specified pouch. Its panel labels, boundaries and instructions connect the design to the intended construction. Read the supplied legend and revision; a pouch photograph or generic outline cannot provide the same placement instructions.
Is 3 mm of bleed correct for every pouch?
No. Use the bleed requirement on the current supplier template. First check whether that template already includes bleed, then extend permitted artwork to its indicated boundary. Adding an assumed allowance or enlarging the entire drawing can conflict with the supplied layout.
Is the safe area the same as the seal area?
No. A safe area identifies where specified content should remain; a seal area identifies a structural region with its own instructions. Their boundaries may relate, but one does not replace the other. Check any local no-ink restriction even when the artwork meets a general safe-area boundary.
Can artwork cross a gusset or self-sealing strip area?
Follow the applicable template instruction. A permitted background and essential wording may need different treatment. Check folds, the confirmed closure location and the intended opened condition before approving text or alignment-sensitive graphics. The fact that a region can receive background does not establish that it suits every element.
Can I resize an existing dieline for a different pouch size?
Do not treat a scaled copy as an approved production drawing. Ask the supplier to confirm the new size, construction and corresponding template. Then adapt the artwork to that drawing and recheck the panels, local restrictions and opening features affected by the change.
Should the dieline appear in the final printed artwork?
Technical guides must not print unintentionally. Confirm whether the supplier wants a separate technical layer, a review file, clean artwork or a specified combination. Keep the template identity available for checking, and inspect the production proof for unwanted lines, dimensions and instructional labels.