
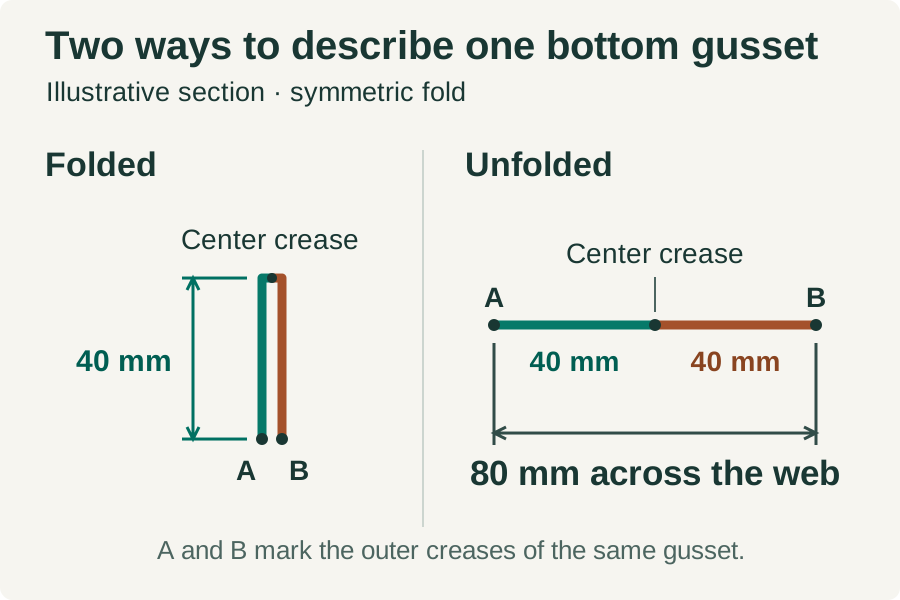
If one quote lists a 40 mm bottom gusset and another lists 80 mm for the same pouch width and height, ask each supplier to draw the two endpoints. Both numbers can describe the same fold. Once the drawings agree, try your product or filling tool in the opening. At the target net weight, measure the clearance below the final seal and the thickest part of the closed pouch.
Start with the dimension that has to fit
A useful size brief starts with the first thing that would make a bag unusable. For an individually wrapped biscuit, that might be the opening through which the packer slides the biscuit. For a pouch of flour on an existing filling line, it might be the room needed around the filling nozzle and above the powder for the final seal. For a row of filled pouches in a retailer’s display tray, it could be the thickness at the fullest point. Each of these questions requires a different measurement.
Suppose your sample holds the right weight of cookies, but the largest cookie only goes in if the packer turns it sideways. Mark where the cookie catches on the opening. Send the marked sample or a photo to the supplier and ask for an opening that accepts that cookie in the normal packing motion. If the retailer has set a maximum display width, put it on the same drawing so the supplier knows which dimension must stay fixed.
Write down who will check the revised sample. The packer can try the largest cookie at the filling station. The retail buyer can put the filled pouch in the display tray. Give the designer the drawing revision that passes both checks before they position the artwork.
How to measure an empty food pouch
Place an empty, undamaged sample on a flat surface. Let the folds sit naturally, smooth out loose wrinkles and avoid stretching the film. Write down the sample ID, unit of measure and which end was supplied open for filling. Mark the front on a photograph. If two people can look at the same photo and pick different starting points for a dimension, add arrows before recording the number.
Start with the outside width across the body and the outside height from the bottom edge to the top edge, using the orientation shown on the drawing. Record a protruding cap or other fitting separately where applicable. Measure the flat distance between the inner edges of the side seals at the filling end as a separate entry. Take a front photo of the flat sample with the ruler on your marked line. For a gusset, add a close-up of the fold with the start and end points visible. On a formed base, photograph the underside as well. These views let another person repeat the measurement.
| Empty sample | What to put on the drawing | What still needs a physical check |
|---|---|---|
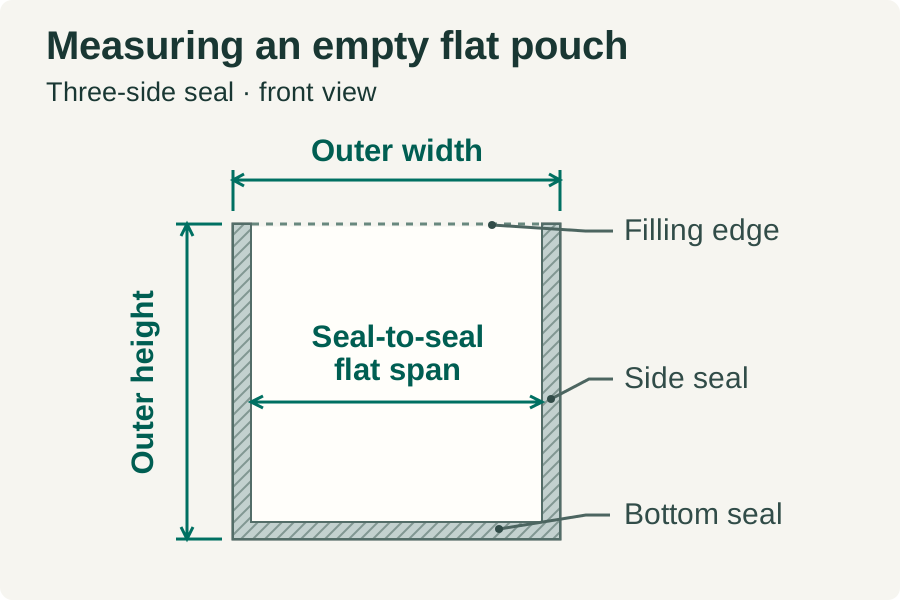
| Three-side-seal flat pouch | Mark the filling edge, outside width and height, and clear span between the inner seal edges at that opening. | Pass the thickest representative piece through the opened mouth in its normal orientation. |
| Bottom-gusset stand-up pouch | Mark outside width and height, then draw the gusset arrow from its stated start to its stated finish. Note whether the number covers one fold or the full gusset. | Observe base expansion at the intended fill and the room left for the final top seal. |
| Side-gusset bag | Mark the front width, side fold and bag height separately. Identify the seam and show where the top folds over if that is part of the pack. | Measure the side profile once the food has settled and the intended top closure is in place. |
| Flat-bottom or box-bottom bag | Mark the front width, side-panel dimension and formed base dimensions individually. Identify any edge included in the quoted measurement. | Set the filled bag on its intended base and check its footprint and maximum projection against the shelf or case. |
Start with the seam layout of a three-side-seal flat pouch. Follow the edge from one corner to the other with your finger. The material includes the side seals. Move inward to where each seal ends and you have a second pair of reference points. For example, imagine a straight 160 mm panel with a 7 mm seal on one side and a 9 mm seal on the other at your marked line. On this illustrative drawing the flat span is 160 − 7 − 9 = 144 mm. Use 144 mm as the flat seam-to-seam reference at that line. Try the actual product or filling tool in its packing orientation to establish clearance. If the mouth tapers, move the measurement line to the narrowest part the product has to pass. Someone receiving a sample from the next production run should be able to repeat the reading from your note.
With a side-gusset bag, pay particular attention to the order of the numbers on the quote. A supplier may list front width, side depth and then height. A different form may ask for width and height first. Transfer each labeled value to your purchase brief while keeping the original line beside it. On a box-bottom pouch, also look underneath. A side-gusset figure on its own leaves the actual base-panel dimensions to be confirmed on the drawing.
How a 40 mm gusset and an 80 mm gusset can describe the same fold
Take two illustrative quotes for a symmetric bottom gusset. Both specify an empty outer width of 160 mm and an empty outer height of 230 mm. Supplier A measures from the bottom edge to the deepest point of the internal fold and quotes 40 mm. Supplier B lays out the two equal halves of the gusset and quotes their combined span as 80 mm. Once both drawing arrows confirm those definitions, the arithmetic for this example is simply 40 mm + 40 mm = 80 mm.
Suppliers publish both measuring instructions. Tri-Cor’s guide takes the reading on the folded empty bag. PackSmart’s diagram shows how it states the combined figure using two equal halves. For your order, the approved supplier drawing determines which convention applies.
Once the arrows agree, enter the gusset measurement in the purchase specification. Leave the carton-depth field blank until the packer fills and closes a sample. To complete it, stand the bag in its intended orientation and measure across the two furthest projections, even if those points sit above the base.
The following illustrative comparison shows how two quotes can describe the same symmetric bottom gusset. Check the measurement endpoints and drawing revisions before agreeing on a sample specification.
| Field to reconcile | Quote A | Quote B | Agreed sample specification |
|---|---|---|---|
| Body and unit, illustrative | Symmetric bottom gusset, mm | Symmetric bottom gusset, mm | Same construction family. Verify drawing revisions. |
| Empty outer width × height, illustrative | 160 × 230 mm | 160 × 230 mm | Edge to edge, same orientation |
| Gusset, illustrative | 40 mm, one fold | 80 mm, two equal halves together | 40 mm per half if the marked endpoints agree |
Then reconcile the remaining details against the supplier’s drawing and a filled sample:
- Side panels and formed base: Where applicable, ask the supplier to mark side-panel depth and formed-base dimensions separately on the drawing.
- Drawing and tolerances: Compare the drawing IDs and revisions. Ask the supplier to state the unit and tolerance for each critical dimension.
- Filling edge: Mark the filling edge and measurement line. Measure the flat span between the inner edges of the side seals, then check the opened mouth with the actual product or filling tool.
- Consumer opening and self-sealing strip: If fitted, mark their positions and check that the intended product or utensil can pass through the opening.
- Final seal zone: Mark the proposed seal band and its distance from a stated reference edge. Ask the packer to confirm the clearance needed for the actual equipment.
- Filled dimensions: Fill and close the sample as intended, then measure the maximum width, height and depth in its intended orientation. Include any closure or other feature that affects case or shelf fit.
If one quote still says only “160 × 230 + 40,” send one request that will resolve it. Please mark the two endpoints of the 40 measurement, give its unit, identify the filling edge and show where you take the clear opening measurement. Save the reply with the drawing revision. A clear sample photograph beside a ruler can catch a misunderstanding early, especially when a purchasing system offers just one box labeled “depth.”
Check the filling opening and the room for the final seal
Try the opening in the shape it takes during filling. A broad, thin bar can sometimes enter a mouth that catches a narrower but much thicker piece. Guide a representative piece, including its widest part, through the opening in the intended direction, using the same wrapper or coating it carries at packing. If the operator has to flex the product, rotate every piece or hold the seals under tension, describe the movement and where it catches. The supplier can work from that observation more readily than from a request for “slightly more capacity.”
For a resealable pack, mark two edges on the drawing if the filler and consumer use different openings. Check the distance and clearance around the filling spout or tool at the filling edge. At the consumer opening, fully open the self-sealing strip and try the utensil or piece of food that needs to pass through it. Check whether the ends of the strip or the corners limit access on the actual sample. The usable opening is easiest to settle with the sample and the intended motion in front of you.

Height needs the same care. The top of the film, the reclosure, the lower boundary of the final heat-seal zone and the surface of the food are four possible reference lines. Mark the heat-seal band and the reclosure separately on your drawing. Specify the edge of each feature from which you measure. A change to the height of the printed header can alter the outside height without giving the product any more working space. The packer should confirm the clearance needed on the actual equipment. For a bottom-gusset format, the stand-up pouch sizing notes show which dimensions to bring to that discussion.
What two 22 cm food pouches tell a buyer
Mylarbag’s 125 g loose-leaf tea project lists a flat-bottom pouch at 12 × 22 + 6 cm. Its 500 g organic coconut sugar project lists a flat-bottom pouch at 13 × 22 + 5.5 cm. Both entries give 22 cm for height, yet one pairs that height with 125 g of leaf tea and the other with 500 g of sugar. If your shelf has a height limit, either listing gives you a starting point for a sample request. To choose a size for your tea, you will still have to fill it with your blend.
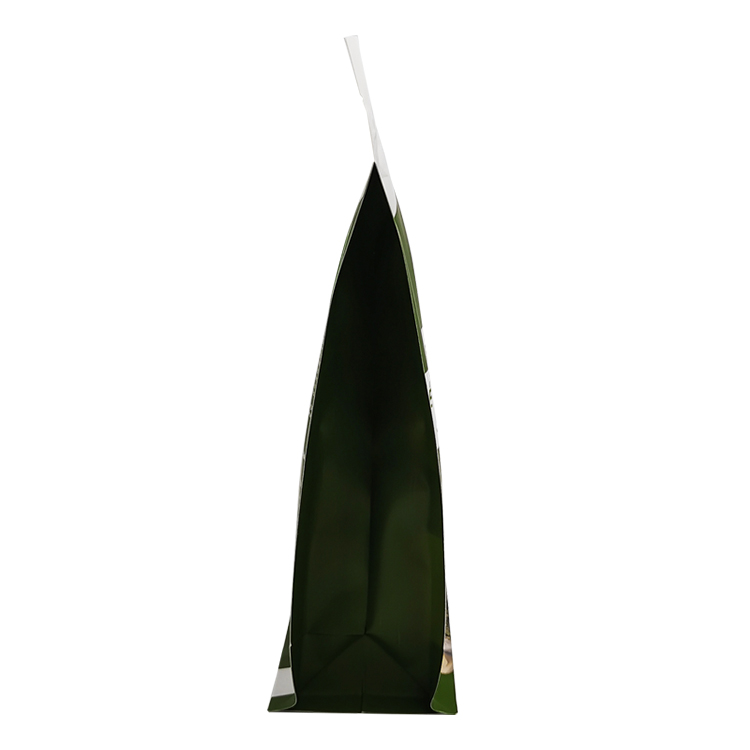
When you write the sample request, name the feature you want to keep. A buyer could write, “We like the 22 cm height of the coconut sugar pouch. Please mark the base and the clear filling opening on a drawing, then send empty samples to try with our loose-leaf blend.” After filling each sample, record the highest leaf and its distance from the proposed seal. For a change from loose leaves to individually wrapped bags, see the tea packaging bag size guide.

Test the candidate size with the food you plan to sell
Give the person running the trial a question they can answer with a sample in hand. For loose tea, it might be “At our declared fill, can we keep the leaves below the proposed top seal through the filling cycle?” For a bar, it might be “Can we load the thickest bar we sell through this opening without bending it?” The question determines which product to bring, where to put the ruler and who should sign the result.
Label two candidate pouches A and B and keep their drawings beside them. Record the sample reference, material and drawing revision. Ask which details differ from the proposed production bag. A stock sample can help establish whether a bar will pass if the sample reproduces the proposed opening, material behavior and closure. If it has a different closure position or a different base, identify the dimensions that still need checking on the next sample.
Our EcoCoffeeBag stock size chart lists an 8 oz coffee fill for both a 15 × 23 + 5 cm stand-up pouch and a 13 × 20 + 7 cm flat-bottom bag. Ask the supplier to mark what the last figure spans on each drawing, then measure the shelf depth you need with each sample filled and closed.
Establish the fill and the measurement points
Tare the scale with the empty pouch in place, or subtract that pouch’s empty weight from its filled weight. Use the same product batch, target net weight and filling method for both candidates. With a mixture of whole pieces and fines, take representative portions for each. A scoop from the bottom of the bin can behave quite differently from one taken off the top. Record the actual net fill for each bag, even when both were intended to hold the same amount.
Decide when you will read the product level. If the packer seals immediately after dosing, check the clearance at that moment. If the normal process includes vibration or a wait, reproduce it and record the condition. Hand-compressing an overfull sample can make it look suitable for a machine that has no equivalent step. For irregular foods, include the highest piece that could enter the closure area as the pouch advances.
On a test bag, mark the lower edge of the proposed final heat-seal band on the outside, using the drawing to locate it. Measure vertically from the highest point of the fill to that mark while the pouch is held as it will be closed. Record contact or overlap if food reaches the band. An opaque bag may require a separate sample to observe the level. Describe the observation method and any disturbance caused by opening it. Your packing team sets the clearance criterion for its process.
Record what changes when the bag is filled
Close or seal the sample using the intended arrangement. Put it in its normal retail or shipping orientation. Measure the maximum filled width, height and depth with light contact. Include the protruding cap, folded top or other feature if it will be present when the pack goes into the case. If a retailer measures from a defined face, identify that face in the record. Use a photograph to show where the widest or deepest point occurs.

Use the checks below to compare Candidate A and Candidate B under the same product and trial conditions. Record the observed results and units for each sample.
| Measurement or observation | How to check | What to record |
|---|---|---|
| Sample ID and drawing revision | Compare each sample with its drawing and the proposed production bag. | Sample ID, drawing revision and any differences in the opening, closure, base or other relevant features. |
| Food and filling method | Use the same product batch or representative mix and the intended filling method for both candidates. | Product condition, batch or mix, and how each pouch was filled. |
| Target and actual net fill | Tare the empty pouch on the scale, or subtract its weight from the filled weight. | Target and actual net fill in grams, excluding packaging weight. |
| Empty outer width × height | Lay the empty sample flat and measure from outside edge to outside edge in the drawing’s orientation. | Width, height, unit and measurement orientation for each sample. |
| Flat span and filling opening | Measure the flat span between the inner edges of the side seals at the marked filling line. Then test the opened mouth with the product or filling tool. | The marked line and flat span, plus where the product or tool catches, if at all. |
| Clearance immediately after filling | Mark the lower edge of the proposed final heat-seal band. Measure from the highest point of the fill to that mark. | The clearance, measurement endpoints and any contact or overlap with the proposed seal area. |
| Clearance at closing | Repeat the clearance measurement using the same endpoints just before the intended closing step. | Clearance, elapsed time and any waiting, vibration or handling between filling and closing. |
| Maximum filled width × height × depth | Close the filled sample using the intended arrangement. Measure its maximum projections in the intended orientation. | Width, height and depth, orientation, and any cap, folded top or other included feature. |
| Case or shelf fit | Place the filled, closed sample in the intended shelf or case arrangement. | Planned pack count and the location of any contact or interference. |
| Decision and follow-up | Compare the observations with the supplier’s drawing and the packer’s agreed requirements. | Decision, outstanding checks, photo reference and person responsible. |
When a dimension is close to a limit, fill several samples from the same candidate under the agreed conditions and keep the individual readings. Report the smallest seal clearance and greatest filled depth you observed and the number of packs checked. A small trial helps identify what needs investigation. Ask the supplier for its manufacturing tolerance and the packer for its line requirements before setting a production acceptance limit. Keep those agreed limits in separate fields from your observed sample range.
For packs that stand on a shelf, compare your recorded depth with the space behind the shelf edge. For a pack shipped on its side, load the intended count into an actual case. A small change in filled thickness can matter across a full row. Look for displaced dividers, an upper flap that needs force to close or an opening feature trapped against the next pack. Record the place where contact occurs so the supplier can distinguish a problem at the base from one at the closure.
Revise the measurement that failed
Food reaches the seal area. Start with the fill record. Verify the net weight and whether a stray piece, airborne powder or the whole product bed reached the marked line. If the entire bed is too high, ask for more usable height or a different cross section and repeat the trial. If the bed sits well below the mark while dust lands on the seal, ask the packer to examine the filling path. Increasing the outside height alone may leave that path unchanged.
The listed width looks sufficient, but loading is slow. Watch the entry point. A thick product may catch between the ends of a closure, on the edges of a side fold or at the narrowest point around a filling tool. Mark the contact points on a spare sample and photograph the product or tool in its working orientation. Ask the supplier to address that specific clearance. If the filling edge is different from the consumer opening, identify which one needs revision.
The filled pouch exceeds the case depth. Mark the thickest part of the closed pack and check what it rests against. A folded closure that meets the opposite pack calls for a different discussion from a base that is too deep for the divider. Agree where the finished pack must fit and give the supplier the case's usable internal dimensions and pack arrangement. After revising a fold or panel, repeat the net-fill and seal-clearance checks on the new drawing revision.
Send the size brief and define what is approved
The following request can accompany your comparison sheet and the marked drawings.
Please quote the attached pouch drawing at the stated revision. Identify the finished outside dimensions, gusset convention, clear filling opening and position of the final seal. Show your proposed tolerances for the marked dimensions. Identify which sample matches the quoted body and closure and list any differences we need to trial. Our attached fill record gives the product, net weight, packing orientation and case constraint.
Add quantity per design, destination and the intended filling equipment so the supplier can prepare a comparable quotation. Keep one signed drawing and a labeled retained sample together. Mark the decisions the trial established, such as entry clearance for the largest piece or filled depth in the shipping case. Give separate owners to checks still due on the production line, including sealing-process approval. If a later drawing moves the self-sealing strip, repeat any check that used its position as a reference.
Frequently asked questions
Are pouch dimensions usually inside or outside measurements?
Many suppliers give the finished outside width and height. Some stock catalogs list a usable inside size as well. Identify the drawing endpoints for each number before using it for a filling opening or a case layout.
Does a gusset marked “40 + 40 mm” mean the same thing as “80 mm”?
It can, if the figures refer to the two halves of the same symmetrical fold and the same total span. Ask both suppliers to draw the arrows and identify whether the bag is flat or opened. Measure the filled footprint separately.
Where do I measure usable height on a resealable pouch?
On a conventional flat pouch, measure the inside pocket from the inner edge of the bottom seal to the lower edge of the self-sealing strip. For a gusseted base, agree on a base reference with the supplier. On the filled sample, separately measure from the highest point of the food to the lower edge of the intended final heat seal.
Can a 250 g pouch for one food hold 250 g of another?
Use that size as a candidate and test each food at its target net weight. Particle size, bulk density and settling affect the space the food occupies. Check the opening and seal clearance with both products before sharing one bag size.
Why does a product fit inside the pouch but catch at the opening?
The body can expand after the product passes the entrance. A relatively narrow opening, thick folded edges or a closure can obstruct that first movement. Repeat insertion with the largest saleable piece in its normal orientation and mark where it touches.
Which dimensions should the supplier confirm before artwork approval?
Confirm the outer panels, folds, seals, filling edge and opening features against the production drawing. Identify critical dimensions and tolerances, then check the design on the sample in its filled orientation. Give the designer and packer the same approved revision.
Send Mylarbag your pouch dimensions and fill brief, including the marked drawing, target net weight and the measurement you need the next sample to confirm.