
A gusseted bag has a folded section of material that opens to give the bag depth. In food pouches, the fold may run along the sides or sit at the bottom. The name identifies a construction feature, not a material, filling capacity or performance rating. Check the empty sample, its opened form and the approved drawing together before choosing dimensions or arranging artwork.
This guide concerns premade flexible food pouches. It explains what to look at when a supplier describes a bag as gusseted, and what to put in a sample brief. Material suitability, food-contact requirements and the filling process still need their own project-specific review.
Start with the empty pouch: a fold is not a seam
An empty pouch on a desk can hide much of its construction. The front and back lie close together, while folded material is tucked between them. A photograph taken directly from the front may show the printed face clearly without showing where that extra material sits.
Begin with an unfilled sample that you can handle. Open its intended filling end gently, look down the sides, and turn it over to inspect the underside. Keep the sample intact. Cutting through a seal before locating the folds can make the original construction harder to understand.
Follow the material, not just the outline
A fold changes the direction of the material. A seam joins material surfaces. They can appear close together, but they answer different questions: the fold shows where the pouch can open out; the seam shows how that construction is held together. Trace each separately on the sample or ask the supplier to mark them on its drawing.
The definition used by equipment manufacturer HMC Products describes an inward-folded panel that expands during filling. That is the useful starting point. It does not tell you the finished bag's material, reclosure, allowable fill or production method.

Lying flat is a sample condition, not a reliable bag-type label. The photographed mole pouches are listed as a stand-up format even though they are shown laid down. For the wider range of formats, our food packaging pouch types guide connects the selling unit with a suitable shortlist. Here, the task is narrower: identify the material that unfolds before comparing names on a quote.
Watch how a bottom gusset opens
A bottom gusset sits in the lower part of the pouch, between the front and back. Opening the pouch allows that folded material to spread into the base. The bottom fold and the surrounding seals work together; the visible outline alone does not describe the complete seal arrangement.
This is the familiar construction of many stand-up pouches. Our stand-up pouch options show the format alongside opening and material choices. The word “stand-up” describes the intended presentation, but the actual product, fill distribution, material and base construction affect how a particular pack sits.
Scroll horizontally to view the full diagram.
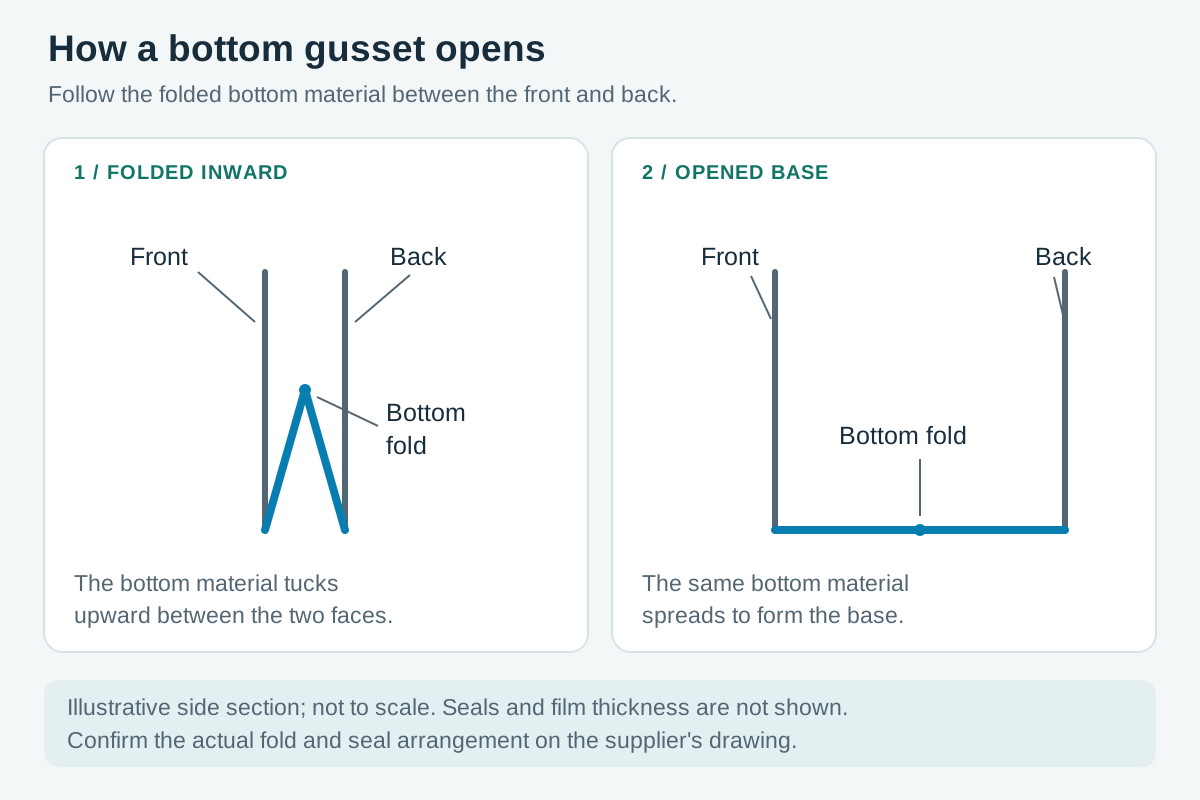
The diagram follows the same bottom material in two schematic states. It is folded upward between the faces on the left and spread across the base on the right. It does not show a particular seal width, film thickness or approved filled shape. Those details belong to the selected construction.
You may encounter rounded, K-style or folded-bottom descriptions. Ask for the corresponding drawing rather than treating those names as capacity grades. Mark the bottom fold, relevant sealed areas and the reference points used for dimensions. A familiar name is helpful shorthand only after both parties agree what it describes.
Related Project: a printed stand-up pouch for mole paste
This printed mole-pouch project is publicly listed as a stand-up pouch with gravure printing and dimensions of 11 × 18 + 3 cm. Keep that notation attached to its original project. The record does not define the measurement endpoints well enough to transfer the final “3 cm” into a new drawing without clarification.
Its photographs give a real reference for the front and back layout. They do not expose the complete bottom seal or demonstrate a particular thermal processing method. If your product is a sauce, for example, its filling and processing conditions must be discussed separately from the decision to use a bottom-gusset pouch.
Read the side folds and the longitudinal seam separately
Side gussets run along the sides of the bag. As those folds open, they create side-panel space between the front and back. Look at both sides, then locate any longitudinal joining seam. A seam down the back is not another gusset, and its position can affect how artwork is arranged on the back face.
The base needs a separate look. “Side gusset” tells you where the folds are; it does not finish the description of the bottom. Nor does it specify a particular opening or reclosure. Compare the fold and seam options on our side-gusset pouch page, then identify the exact sample you want quoted.
Related Project: a coffee pouch with an orange side panel
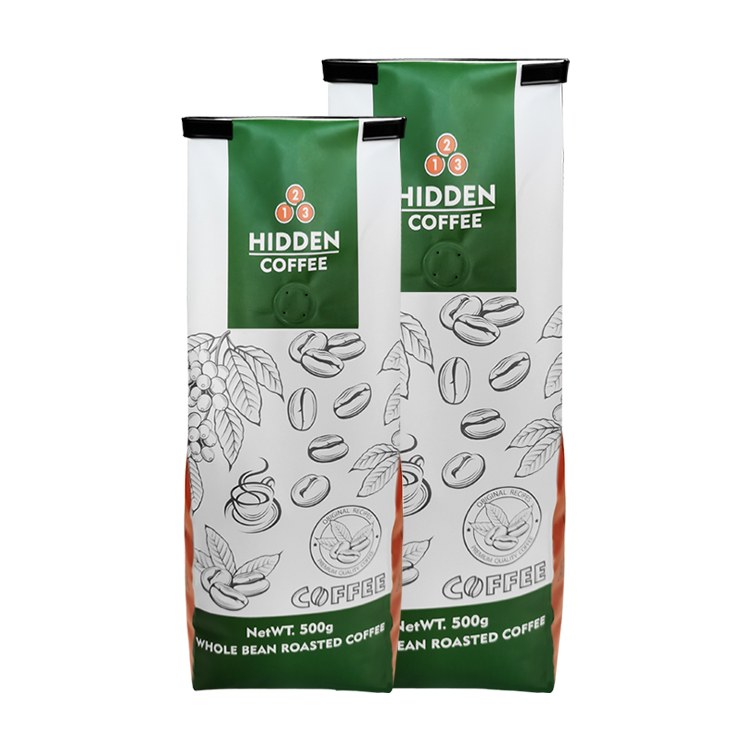
The orange panel in the photograph makes the side area easier to identify than it would be on an entirely white bag. The bean illustrations continue across different surfaces, while the main coffee name stays on the front. That is a visible layout choice, not evidence of a particular filling capacity or protective performance.

The published side-gusset coffee-pouch record lists 10 × 34 + 6 cm, digital printing and MATOPP/VMPET/PE. It describes a 500 g coffee project. Those fields identify that configuration; they do not establish how much a different food will occupy or prove that the final dimension means one folded depth.
For your own sample, inspect the intended filling end before choosing the closing method. Can the folds open sufficiently for the filling operation? How should they be arranged before the final seal? Where does the customer open the pack? A fold-over arrangement, a self-sealing strip and a particular panel-access feature are separate specification decisions, not features guaranteed by the word “gusseted.”
If a side-panel pattern must continue onto the front, review it with the sample both flat and formed. Part of that pattern may disappear into a fold while the bag is empty. A buyer should approve that change in appearance deliberately, rather than discovering it after approving a flat artwork preview.
A formed base can sit alongside side gussets
Side and bottom descriptions are not universally exclusive. Some constructions combine side gussets with a bottom that opens or is formed into a defined base. A flat-bottom or box pouch is therefore an important case to examine when someone presents only “side” and “bottom” as two opposing choices.
There are documented examples beyond terminology. ProAmpac's QUADFLEX announcement describes side-gusset formats with different bottom arrangements. The technical description in US9475248B1 also describes a pouch incorporating side and bottom gussets. These establish that combined constructions exist; they are not a universal manufacturing specification for every box pouch.
Scroll horizontally to view the full table.
| Construction to inspect | Fold or base cue | Confirm on the sample and drawing |
|---|---|---|
| Bottom-gusset stand-up pouch | Material folded into the lower part opens to form the base | Bottom fold and seal arrangement, intended opening and filled presentation |
| Side-gusset pouch | Inward folds along the sides open into side panels | Side-fold depth, longitudinal seam and actual bottom construction |
| Flat-bottom / box pouch | Side gussets work with a formed base | Base layout, corner seals and the front, back, side and bottom artwork areas |
These are useful recognition cues, not an exhaustive set of mutually exclusive engineering categories. Quad seal adds another kind of information: it refers to a four-corner or edge-seal arrangement. Four vertical seals do not, by themselves, tell you exactly how the bottom is constructed.

The white box-bottom coffee-pouch project illustrates why a side view is useful. You can see a different surface and the folded area near the open top. You still cannot read every underside seam from this photograph. For a formed base with separate panel planning, review our flat-bottom pouch options, then confirm the bottom view and seal map on the drawing supplied for your project.
Read the gusset dimension on its own drawing
Before interpreting a number marked G, ask what it measures. It might describe an inset fold, an opened side panel or a bottom dimension under the supplier's convention. Record the unit and sample condition alongside the endpoints. A width-height-gusset expression without those details leaves room for two people to describe different spans with the same word.
US Poly Pack's measurement guide uses different expressions for its side-gusset, bottom-gusset and combined formats. Treat that as a supplier-specific example of why the construction matters, rather than requiring every converter to follow one ordering of numbers.
Scroll horizontally to view the full table.
| Dimension or notation | Ask the supplier to mark | Do not substitute it for |
|---|---|---|
| Flat outside width | The two outer edges on the unfilled bag | Clear filling opening or usable inside width |
| Overall height | The reference top and bottom edges in the stated sample condition | Usable fill height or final filled height |
| Fold inset | The crease and outer reference edge for the stated fold | A complete opened panel without confirming the construction |
| Opened side or bottom dimension | The two endpoints and whether the material is opened or the pack is filled | A guaranteed base footprint, volume or food weight |
Scroll horizontally to view the full diagram.
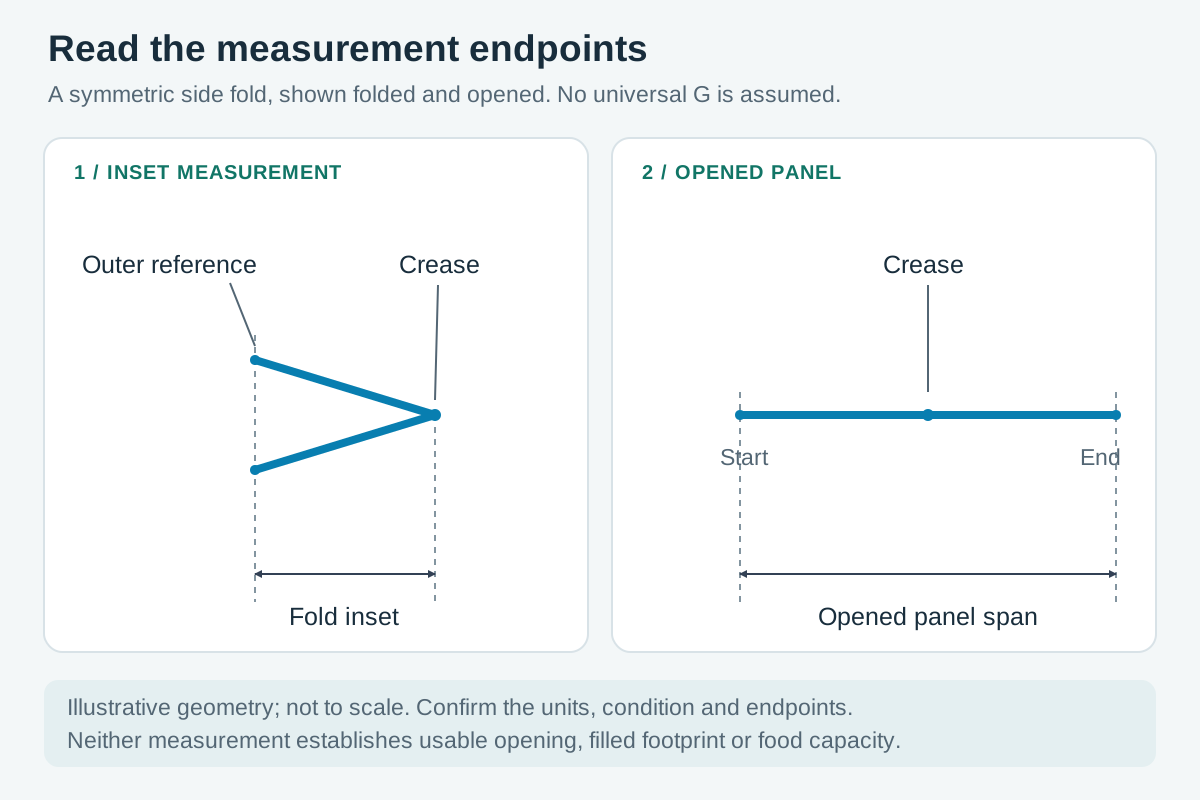
The drawing separates two measurements without assigning a universal meaning to G. Do not automatically double a number from a quote unless the supplier has confirmed the fold, endpoints and convention. For the complete measuring process and its worked example, use our food pouch size guide.
Outside dimensions also do not describe every part of the usable space. Sealed areas, the opening and the final closing arrangement remain relevant. A larger quoted gusset cannot, on its own, guarantee that a scoop passes through the mouth or that a particular food weight fits as intended.
For a coffee-specific example, our related EcoCoffeeBag site compares three different pouch configurations for a 250 g coffee fill; the common weight does not give them one interchangeable set of dimensions. Preserve the drawing and sample reference when discussing any similar configuration for your own product.
Plan artwork for the folded and filled pouch
A flat artwork preview shows the design before the bag takes shape. A gusseted pouch adds another question: which information remains visible when the folds close, open or change position during use? Assign a job to each panel before placing the final graphics.
Keep the product name and other information needed at first glance on the face intended to meet the buyer. Supporting graphics may continue onto a gusset, but check how they appear with the bag empty and filled. Do the same for information near a base fold or joining seam. A continuous pattern and a small line of essential text do not need to be treated identically.

The photographed back panels provide a concrete place to start that review. Locate the information block, barcode and nearby edges. Then use the production drawing to identify the folds and sealed areas that the photograph cannot fully reveal. Confirm safe areas and bleed with the converter; there is no single clearance in millimetres that this guide can assign to every construction. Check the final printed sample too.
Free design with layered print-ready files
Mylarbag offers free packaging design and free layered print-ready files. You can begin with your logo, product information, existing artwork or a design idea. For a gusseted pouch, the useful first decision is the agreed bag construction and drawing revision, so the design is developed around the surfaces you will actually use.
Discuss the front, back, sides and base as applicable, including which details must remain readable after forming. The production-file requirements should identify the artwork and technical drawing separately, together with any white-ink or special-finish separations needed for the agreed printing process. The required layers depend on that process; they are not identical for every bag.
After artwork approval, the layered files need to match the agreed dimensions and production specifications. A presentation image alone is not that production file. Keep the approved preview, drawing revision and production-file version together so a later size change does not leave the design attached to an obsolete layout.
Turn the fold description into a sample brief
Once the folds are identified, write a brief that another person can use without guessing which view or measurement you meant. A few marked photographs can be more useful than a long description such as “the usual gusseted food bag.” Include the front, one side and the underside where possible, and identify whether each photograph shows an empty, opened or filled sample.
Use the following checklist to agree the construction. It describes information to obtain; it is not a record of tests already completed.
Scroll horizontally to view the full table.
| Check | Action | What the brief should identify |
|---|---|---|
| Fold location | Inspect the sides and underside of the empty sample | Side, bottom or combined construction with marked views |
| Base construction | Open the proposed sample and compare it with the drawing | Fold path, base arrangement and required sample condition |
| Dimension endpoints | Mark the start and end of each width, height and gusset measurement | Units, view and each symbol's meaning |
| Seal layout | Locate back, offset, corner and bottom seals as applicable | The actual seam map for the selected construction |
| Filling and closing | Review the supplied opening and space needed for the final seal | Filling end, closure choice and areas that must remain clear |
| Filled presentation | Check the intended product and display arrangement | Sample ID, fill condition and any shape issue needing revision |
| Artwork surfaces | Review important information with the bag flat and formed | Panel assignments, fold/seal safe areas and agreed print layers |
| Revision control | Match the sample, drawing and artwork before approval | Drawing revision, sample reference and artwork version |
When the sample does not open or sit as expected
Describe the observation before suggesting a cause. “One lower corner remains tucked in after filling” is more useful than “the gusset is wrong.” Compare the actual fold with the drawing, check how the sample was opened, and record the product and fill condition. Uneven product distribution, incomplete opening or a difference in construction may need investigation; the observation alone does not establish which explanation is correct.
If the base appears different from the agreed drawing, send the supplier the marked photograph and sample reference before changing the dimensions. If the shape is acceptable but important text disappears into a fold, review the artwork placement. These are different revisions, and neither should be hidden behind a general request to make the bag bigger.
Recommended Packaging Configuration
Consider a bottom-gusset stand-up pouch when a broad front face and an expanding display base suit the product brief. Evaluate a side-gusset construction when the expanding side panels and proposed filling or closing arrangement serve the intended pack. A formed flat-bottom configuration may be worth sampling when a defined base and separate artwork panels matter.
Each remains a proposal until its dimensions, material, opening and filled behavior are checked for the product. Discuss your pouch construction and design brief with Mylarbag using the food category, target fill or sample, market, display plan and packing method you already know. An existing pouch or marked photograph is a useful starting point; you do not have to decide every technical parameter before contacting us.
Frequently asked questions
What does “gusset” mean on a food bag?
It is a folded part of the bag that can open to provide depth. The fold may be at the sides or bottom, depending on the construction. Identify it by following the material on an empty sample and comparing the opened form with its drawing. The term does not specify the film material or prove food suitability.
Can a pouch have both side gussets and a bottom gusset?
Yes, combined constructions exist. However, a supplier's flat-bottom, box-bottom or gusseted label is not enough to identify the exact arrangement. Ask for the side and underside views, fold locations and seal layout. Do not assume that every pouch sold under the same name uses the same bottom panel or manufacturing method.
Is a quad-seal pouch the same as a flat-bottom pouch?
Not necessarily. Quad seal describes a four-corner or edge-seal arrangement, whereas flat bottom describes the base construction. The terms can occur together, but one does not establish the other. Compare the actual bottom view and drawing before selecting the sample or allocating artwork to its panels.
Does a larger gusset mean the bag will hold more food?
Changing a gusset can change the opened shape, but that dimension alone cannot establish usable capacity. Confirm what the measurement represents, then consider the remaining dimensions, sealed areas, opening, closing space and actual food. Use representative product in the proposed sample rather than converting an outside-dimension expression directly into grams.
Will every gusseted bag stand upright?
No. A gusset provides material that can unfold; it is not a guarantee of unsupported standing in every condition. Check the intended base, material, product distribution and fill on the actual display surface. An empty bag, an opened sample and a filled retail pack can present differently, so identify the condition being assessed.
Can Mylarbag design artwork for a gusseted pouch and supply layered print-ready files?
Yes. Mylarbag offers free packaging design and provides free layered print-ready files. Share your available brand materials and product information, then confirm the pouch construction and drawing used for the layout. The final files should match the approved artwork, dimensions, printing method and production specifications; a change to the bag may require a corresponding file revision.